Introduction
Microsoft 365 Copilot agents let you create AI-powered assistants optimized for specific scenarios. Using instructions, you define the context for the copilot and configure its tone of voice or how it should respond. By configuring the agent’s knowledge, you give it access to external data that isn’t a part of the Large Language Model (LLM), so that it can respond more accurately.
Example scenario
Suppose you work in an IT department in a large organization. Your organization standardizes IT through different policies which it stores in a specialized system. You and your colleagues in the IT department regularly get questions that are covered in policies. Looking up answers in the policies management system is time-consuming. You would like to provide your organization with an AI-powered assistant capable of answering your colleagues’ questions using authoritative information from the policies.
Learning objectives
By the end of this module, you’ll be able to build declarative agents for Microsoft 365 Copilot. You’ll understand how to configure their instructions to optimize them for a specific scenario. You’ll also know how to integrate them with Microsoft Graph connectors to give them access to external data, that’s not a part of the Microsoft 365 Copilot’s LLM.
Prerequisites
- Knowledge of what Microsoft 365 Copilot is and how it works at the beginner level
- Knowledge of how to build a Microsoft 365 Copilot declarative agent
- Knowledge of how to build a Graph connector
- Microsoft 365 tenant with Microsoft 365 Copilot, and tenant administrator privileges
- Visual Studio Code with the Teams Toolkit extension installed
- Azure Functions Core Tools
- Node.js v18
lab: title: ‘Exercise 1 - Create an external connection for the Graph connector’ module: ‘LAB 04: Add custom knowledge to declarative agents using Microsoft Graph connectors and Visual Studio Code’ —
Exercise 1 - Create an external connection for the Graph connector
Extending a declarative agent with knowledge gives it access to additional information that’s not a part of its Large Language Model. Using Graph connectors, you can ingest external data to Microsoft 365, where it’s available to different user experiences, including Microsoft 365 Copilot. When configuring a Copilot agent’s knowledge settings, you can integrate it with an external connection created by a Graph connector.
Exercise Duration
- Estimated Time to complete: 10 minutes
Task 1 - Download sample project and connect to resources
When you integrate a Copilot agent with a Graph connector, you need to specify the ID of the external connection that the connector created. Typically, you deploy Graph connectors separately from Copilot agents. To complete this exercise, deploy an existing Graph connector which you reference in later steps.
Start by downloading the Graph connector sample project.
- In a web browser, navigate to https://aka.ms/learn-gc-ts-policies. You get a prompt to download a ZIP file with the sample project.
- Save the ZIP file on your computer.
- Create a new folder in Documents.
- Extract the contents of the downloaded ZIP file to the folder you just created.
- Open the folder in Visual Studio Code.
In Visual Studio Code:
- From the File menu, choose the Open folder… option.
- Open the project folder you just extracted to your Documents folder.
- In the Activity Bar (side bar), open the Teams Toolkit extension.
- In the Accounts pane, confirm that you’re connected to your Microsoft 365 tenant.
-
In the Accounts pane, confirm that you’re connected to your Azure subscription.
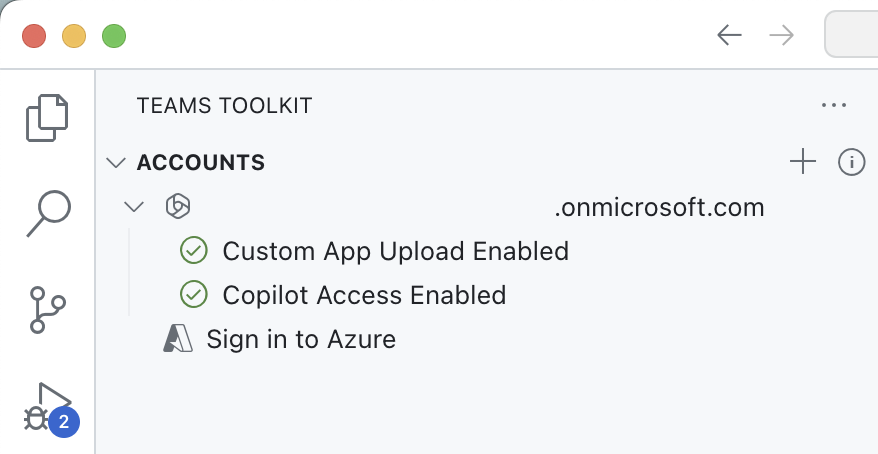
[!NOTE] If you do not a full Microsoft 365 Copilot license, you may see that “Copilot Access Disabled.” The exercises can still be completed, although you may not be able to fully test the agent in Microsoft 365 Copilot Chat.
Task 2 - Run project and create connection to Microsoft 365
- Start the project by pressing F5. Teams Toolkit creates a new Microsoft Entra app registration in your tenant that allows the Graph connector to communicate with your Microsoft 365 tenant. Teams Toolkit also starts the timer-triggered Azure Function which hosts the Graph connector.
[!IMPORTANT] This step can take up to 10 minutes or more to complete, do not close until you have completed the exercise.
-
Before the Graph connector can run, you need to consent to the permissions that the Entra app needs. To grant consent, use the instructions from the Terminal pane associated with the func: host start task.
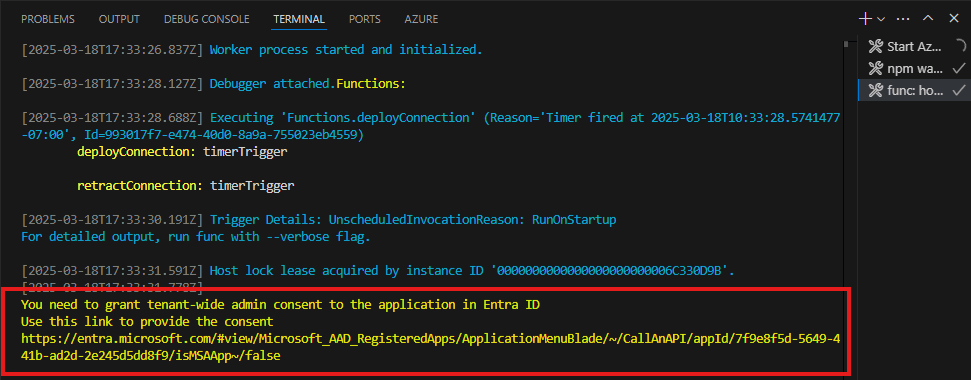
-
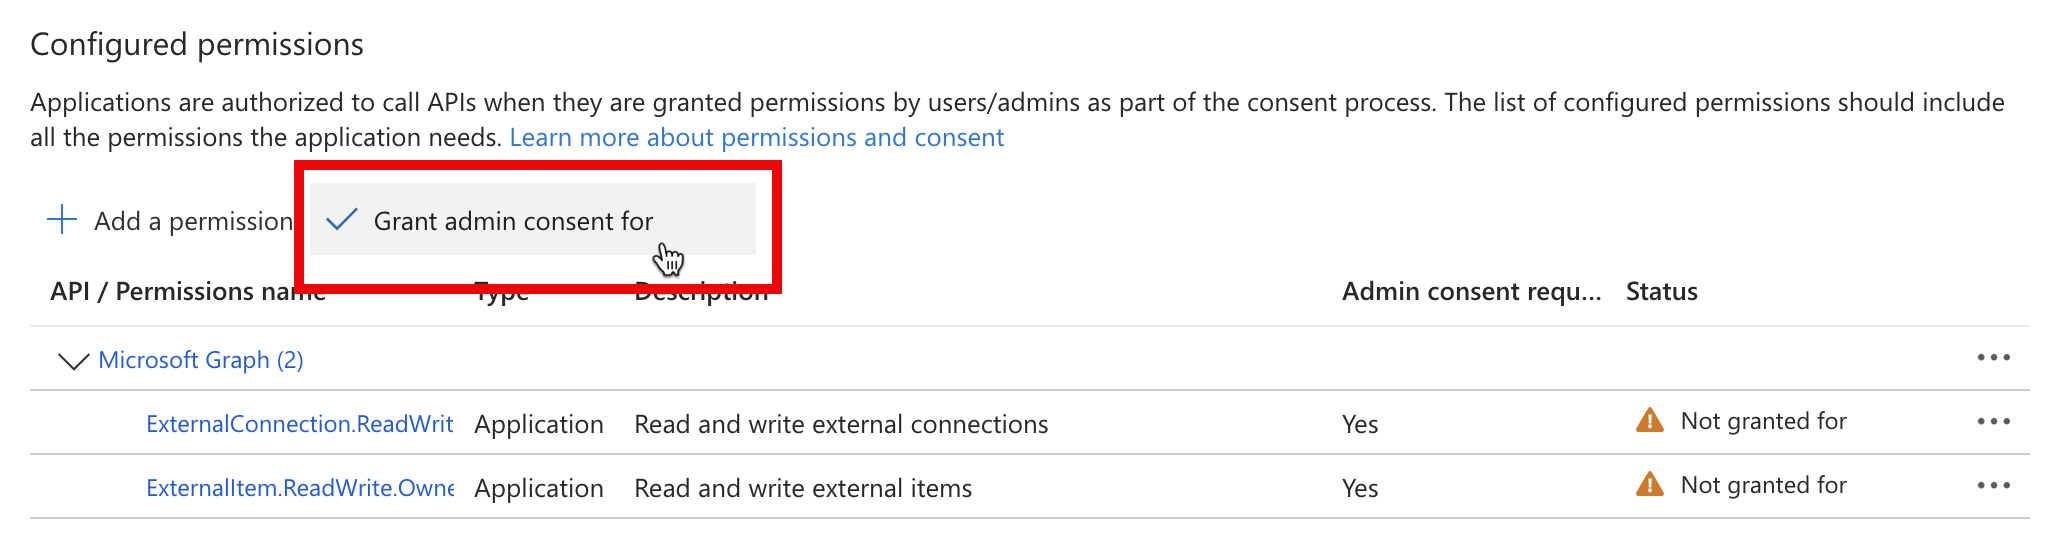
Open the consent URL in a web browser. Sign in with your work account that belongs to your Microsoft 365 tenant. Grant the required permissions to the app using the Grant admin consent button.
- After you grant consent to the required permissions, the Graph connector continues. In the Terminal pane, notice the output of the Graph connector. The Graph connector creates an external connection, provisions the schema and ingests the sample content to your Microsoft 365 tenant.
-
Running the connector takes 5-10 minutes to complete. When it completes, stop debugging, by pressing the Stop button in the debug toolbar.

lab: title: ‘Exercise 2 - Create declarative agent and integrate Graph connector’ module: ‘LAB 04: Add custom knowledge to declarative agents using Microsoft Graph connectors and Visual Studio Code’ —
Exercise 2 - Create declarative agent and integrate Graph connector
In this exercise, you will create a new declarative agent from scratch and configure it to use the external connection as its grounding source.
Exercise Duration
- Estimated Time to complete: 10 minutes
Task 1 - Create a new declarative agent
One way to create a declarative agent is by using Teams Toolkit. Teams Toolkit offers a template project for creating declarative agents, which gives you a great place to start with configuring your agent’s settings and including extra capabilities.
To create a new declarative agent, open Visual Studio Code.
In Visual Studio Code:
- In the Activity Bar (side bar), open the Teams Toolkit extension.
- In the Teams Toolkit pane, select the Create a New App button.
- In the New Project dialog, choose the Agent option.
- In the next dialog, choose the Declarative Agent option.
- Don’t add a plugin by selecting the No plugin option.
- Select a folder where you want to store the project on your computer.
- Name your project
da-it-policies.
Task 2 - Configure declarative agent instructions
Teams Toolkit creates a new declarative agent project. To scope it to your scenario, update the agent’s description and instructions.
In Visual Studio Code:
- Open the appPackage/declarativeAgent.json file
- Update the value of the name property to
Contoso IT policies - Update the value of the description property to
Assistant specialized in Contoso IT policies. - Save your changes.
-
The updated file contents look as follows:
{ "$schema": "https://aka.ms/json-schemas/copilot/declarative-agent/v1.0/schema.json", "version": "v1.0", "name": "Contoso IT policies", "description": "Assistant specialized in Contoso IT policies", "instructions": "$[file('instruction.txt')]", } - Open the appPackage/instruction.txt file.
-
Update the contents to:
You are a helpful assistant that can answer questions from users in a friendly manner. You should take your time to respond. Your responses should be accurate and helpful. If you don't have the information, you should say so in your response. When answering follow-up questions, you should review the information you gathered from external sources, if you don't already have the information to give an accurate answer, you should search for more information. Only answer when you have the information to give an accurate response. - Save your changes.
Task 3 - Integrate Microsoft Graph connector with a declarative agent
After you create a declarative agent, the next step is to integrate it with a Microsoft Graph connector so that it can access external data.
In Visual Studio Code:
- Open the appPackage/declarativeAgent.json file.
-
After the instructions property, add a new property named capabilities with the following code:
{ "$schema": "https://aka.ms/json-schemas/copilot/declarative-agent/v1.0/schema.json", "version": "v1.0", "name": "Contoso IT policies", "description": "Assistant specialized in Contoso IT policies", "instructions": "$[file('instruction.txt')]", "capabilities": [ { "name": "GraphConnectors", "connections": [ { "connection_id": "" } ] } ] } - In the connection_id property, specify
policieslocalas the ID of the external connection.policieslocalis the ID of the external connection that the Graph connector created in the previous steps. -
The updated file contents look as follows:
{ "$schema": "https://aka.ms/json-schemas/copilot/declarative-agent/v1.0/schema.json", "version": "v1.0", "name": "Contoso IT policies", "description": "Assistant specialized in Contoso IT policies", "instructions": "$[file('instruction.txt')]", "capabilities": [ { "name": "GraphConnectors", "connections": [ { "connection_id": "policieslocal" } ] } ] } - Save your changes.
lab: title: ‘Exercise 3 - Test and debug’ module: ‘LAB 04: Add custom knowledge to declarative agents using Microsoft Graph connectors and Visual Studio Code’ —
Exercise 3 - Test and debug
In this exercise, you will test and deploy your declarative agent to Microsoft 365 and test it using Microsoft 365 Copilot Chat.
Exercise Duration
- Estimated Time to complete: 5 minutes
Task 1 - Test the declarative agent in Microsoft 365 Copilot
To test your declarative agent, deploy it as an app to your Microsoft 365 tenant. After opening it in Microsoft 365 Copilot, verify that it works as intended.
In Visual Studio Code:
- In the Activity Bar (side bar), open the Teams Toolkit extension.
- From the Lifecycle pane, choose Provision. Teams Toolkit packages the declarative agent project as an app and uploads it to Microsoft 365.
- Open a web browser.
In a web browser:
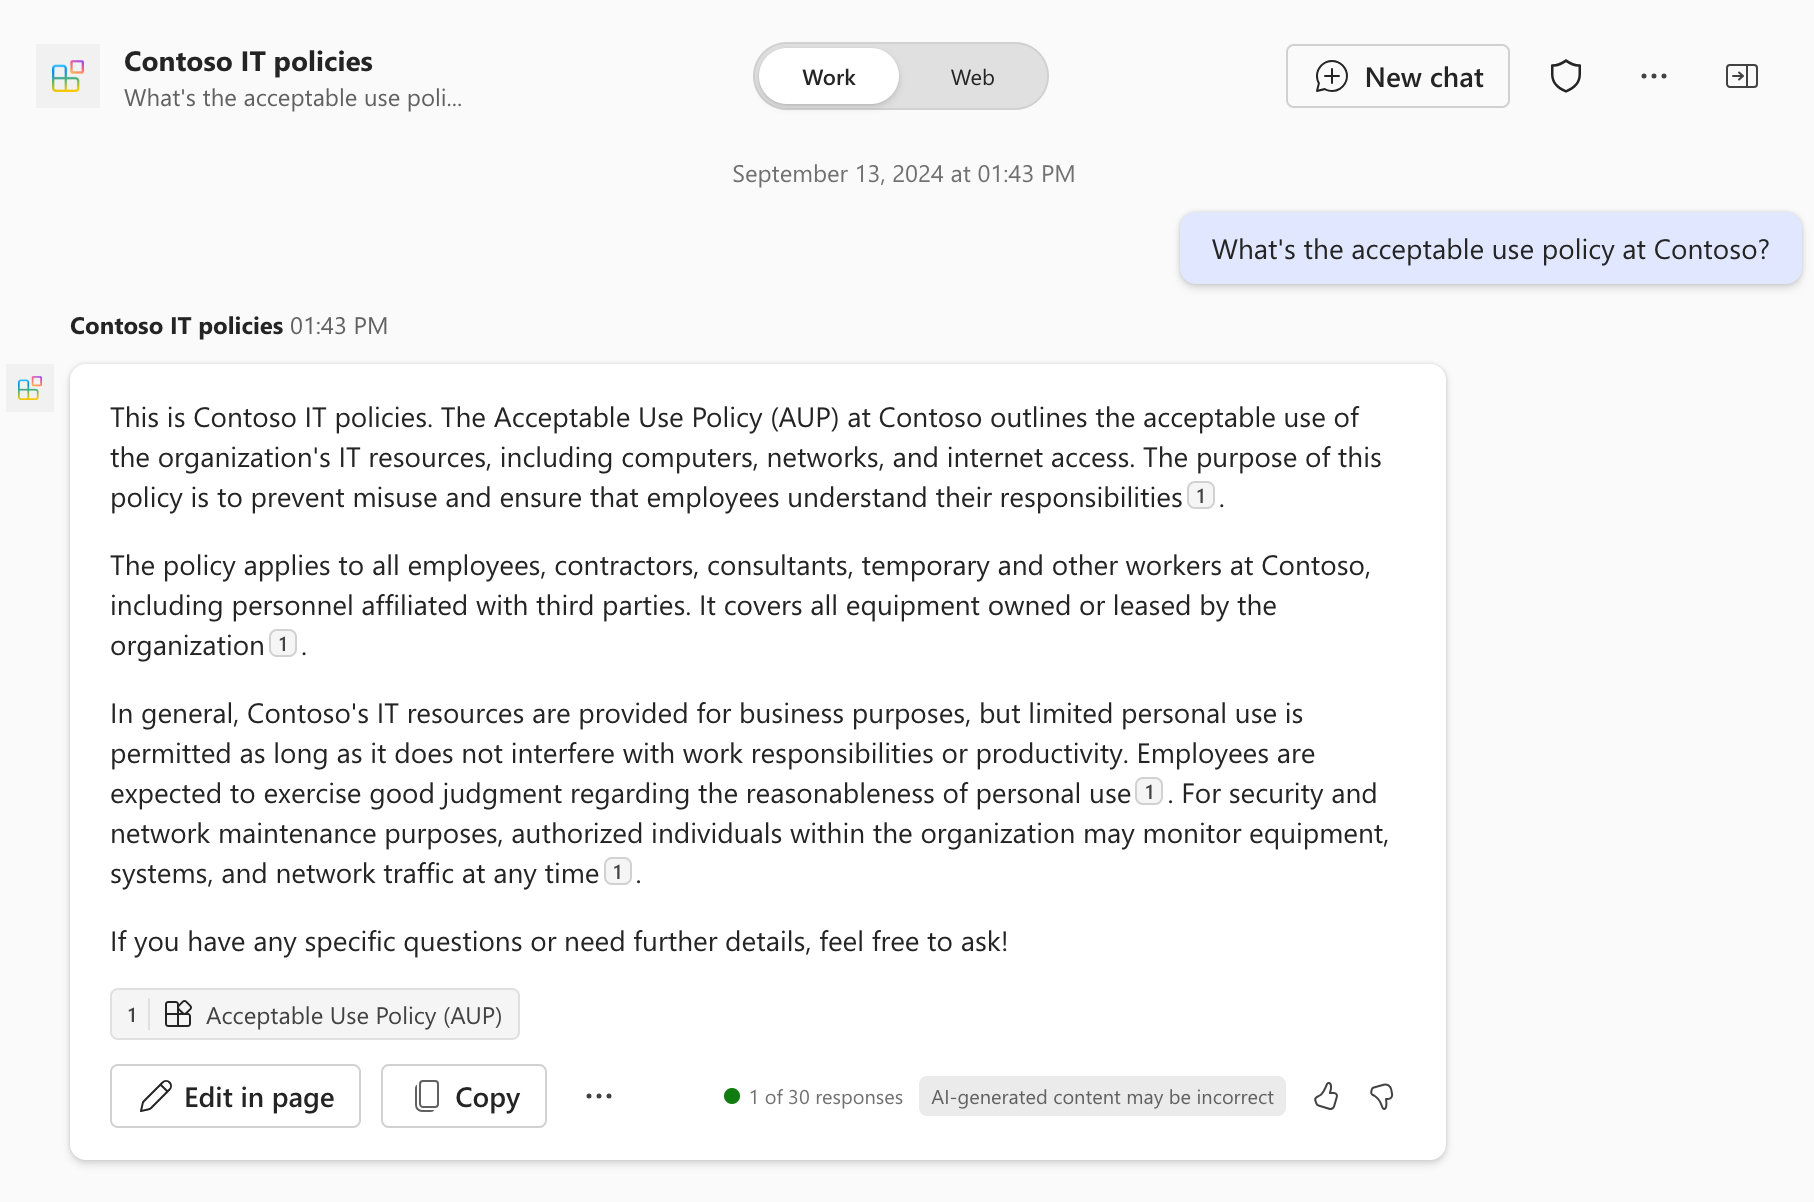
- Navigate to https://www.microsoft365.com/chat.
- Sign in with your work account that belongs to your Microsoft 365 tenant.
- In Microsoft 365 Copilot, in the side panel, select the Contoso IT Policies agent to activate it.
- In the chat text box, ask
What's the acceptable use policy at Contoso?. -
Wait for the agent to respond. Notice how the reply includes references to external content that the Graph connector ingested. The URL in each reference points to the location in the external system where the content is stored.
You’re looking into building a solution for your organization to answer your colleagues’ questions about IT policies. The solution must use authoritative information stored in the policies management system.
You did some research and found that building a declarative agent for Microsoft 365 Copilot, integrated with a Microsoft Graph connector is suitable for your needs, because:
- It allows you to build an AI-powered assistant that understands natural language.
- It allows you to build on top of the infrastructure of Microsoft 365 Copilot.
- It allows you to use instructions to optimize the assistant to your scenario.
- It allows you to connect the assistant to the policies management system so that it can answer authoritatively.
Previously, you and your colleagues from the IT department had to answer questions from within your organization, manually looking up the relevant policies. This was time-consuming and was distracting you from your work.
By building a declarative agent, you offer a specialized assistant that employees in your organization can use to get answers to their questions. By integrating the agent with a Graph connector, you connect it to the policy management system so that it can provide authoritative answers. Having such an assistant saves you and your colleagues in the IT time, allowing you to focus on more specialized tasks.